
In recent years, I’ve had the opportunity to work extensively with AWS Cloud, developing Spring Boot applications that are deployed to AWS ECS using AWS CloudFormation. These applications leverage a wide range of AWS services, including SQS, DynamoDB, Parameter Store, and many others.
A key aspect of modern application development is ensuring that applications can be reliably executed and tested locally. However, when integrating cloud services, replicating the AWS infrastructure in a local environment poses a significant challenge.
For developers working with AWS, an indispensable tool is LocalStack. LocalStack is an AWS cloud emulator that runs in a container, either on your laptop or in a CI environment. This tool allows you to run and test AWS-based applications, including Lambda functions, entirely on your local machine, without needing to connect to the actual cloud. LocalStack supports a wide range of AWS services, such as Lambda, S3, DynamoDB, Kinesis, SQS, SNS, and many more.
In this article, we will explore how to configure a Spring Boot application to run locally using LocalStack. The application will interact with services like SQS, DynamoDB, and Parameter Store through Spring Cloud AWS, demonstrating how to effectively replicate a fully-local AWS environment for more efficient development and testing.
Prerequisites
- Java 21 or higher.
- Installation of Podman or Docker on the machine.
The Spring Boot application
The Spring Boot application uses Java 21, Spring Boot 3 and Spring Cloud AWS 3.3.0 and has the following Maven dependencies:
<dependencyManagement>
    <dependencies>
        <dependency>
            <groupId>io.awspring.cloud</groupId>
            <artifactId>spring-cloud-aws-dependencies</artifactId>
            <version>${spring-cloud-aws.version}</version>
            <type>pom</type>
            <scope>import</scope>
        </dependency>
    </dependencies>
</dependencyManagement>


<dependencies>
    <dependency>
        <groupId>org.springframework.boot</groupId>
        <artifactId>spring-boot-starter-web</artifactId>
    </dependency>

    <dependency>
        <groupId>io.awspring.cloud</groupId>
        <artifactId>spring-cloud-aws-starter-sqs</artifactId>
    </dependency>
    <dependency>
        <groupId>io.awspring.cloud</groupId>
        <artifactId>spring-cloud-aws-starter-dynamodb</artifactId>
    </dependency>
    <dependency>
        <groupId>io.awspring.cloud</groupId>
        <artifactId>spring-cloud-aws-starter-parameter-store</artifactId>
    </dependency>


    <dependency>
        <groupId>org.springframework.boot</groupId>
        <artifactId>spring-boot-starter-test</artifactId>
        <scope>test</scope>
    </dependency>
</dependencies>
Relevant are the Spring Cloud AWS dependencies for SQS, DynamoDB, and Parameter Store, since our application will use these AWS tools.
Spring Cloud AWS Integration with SQS
The application acts as both an SQS producer and consumer. The messages exchanged represent a book, with the following Java model:
public record Book(String isbn, String name) {}
Producer with Spring Cloud AWS SQS
For the producer part, Spring Cloud AWS SQS, in combination with Spring Boot, provides a pre-configured instance of SqsTemplate.
This class can be easily injected into beans and is used to send messages to an SQS queue. Internally, SqsTemplate relies
on an instance of SqsAsyncClient, a client provided by the AWS SDK that handles communication with the SQS API.
Here is an example of a producer class:
@Component
public class BookProducer {

    private final SqsTemplate sqsTemplate;

    public BookProducer(SqsTemplate sqsTemplate) {
        this.sqsTemplate = sqsTemplate;
    }

    @EventListener(ApplicationReadyEvent.class)
    public void produce() {
        var book = new Book("isbn", "Name");
        sqsTemplate.send(to -> to.queue("book-event-queue")
                .payload(book)
                .header("eventId", UUID.randomUUID().toString())
                .delaySeconds(2)
        );


    }
}
In this example, when the application starts, a message is automatically sent to the book-event-queue. The fluent API provided by SqsTemplate allows you to:
- Specify the target queue using the
queuemethod. - Define the payload of the message.
- Add custom headers (e.g.,
eventId). - Set an optional delivery delay (in seconds) using
delaySeconds.
This flexibility makes message publishing straightforward and highly configurable.
Consumer with Spring Cloud AWS SQS
For the consumer part, while SqsTemplate offers methods to receive messages programmatically, the most intuitive and
standardized way to consume messages with Spring Cloud AWS SQS is by using the @SqsListener annotation. This allows you
to configure a bean as a listener for a specific queue.
Here is an example of a consumer class:
@Component
public class BookConsumer {

    private final Logger log = LoggerFactory.getLogger(this.getClass());

    @SqsListener("book-event-queue")
    public void listen(@Payload Book payload,@Headers Map<String, Object> headers) {
        log.info("Book event received, headers: {}, payload: {}", headers, payload);
    }
}
In this case:
- The consumer remains listening on the book-event-queue..
- The message payload is automatically deserialized into a Book object, thanks to Spring Cloud AWS SQS.
- The message headers and deserialized payload are logged for demonstration purposes.
Spring Cloud AWS Integration with DynamoDB
The Spring Cloud AWS DynamoDB starter provides a preconfigured implementation to interact with DynamoDB. During application
startup, a DynamoDbOperations bean is registered, offering a high-level abstraction for working with DynamoDB. The default
implementation of this interface is DynamoDbTemplate, which internally relies on DynamoDbEnhancedClient, an advanced class provided by the AWS SDK.
In our application, we read from and write to a DynamoDB table named person. The domain class is as follows:
public abstract class PersonEntity {

    private UUID id;
    private String name;
    private String lastName;

    // getters, setters, etc...

}
To map this class to the person table, we use the following entity:
@DynamoDbBean
public class Person extends PersonEntity {

    @DynamoDbPartitionKey
    @Override
    public UUID getId() {
        return super.getId();
    }
}
The @DynamoDbBean annotation designates the Person class as an entity mapped to the DynamoDB table person. The table name
is automatically resolved using the DynamoDbTableNameResolver bean. By default, this resolver converts the name of the
annotated class into snake_case and allows for further customization with optional prefixes and suffixes for table names.
CRUD Operations with DynamoDbTemplate
The application leverages a preconfigured DynamoDbTemplate instance, automatically registered by Spring Cloud AWS, to
perform CRUD operations seamlessly. Below is a practical example that writes a record to the person table and retrieves it after the application starts:
@Component
public class DbInitializer {

    private final Logger log = LoggerFactory.getLogger(DbInitializer.class);

    private final DynamoDbTemplate dynamoDbTemplate;

    public DbInitializer(DynamoDbTemplate dynamoDbTemplate) {
        this.dynamoDbTemplate = dynamoDbTemplate;
    }

    @EventListener(ApplicationReadyEvent.class)
    public void initialize() {
        Person entity = new Person();
        UUID id = UUID.randomUUID();
        entity.setId(id);
        entity.setName("John Doe");
        entity.setLastName("Smith");

        dynamoDbTemplate.save(entity);

        Person entityFromDb = dynamoDbTemplate.load(
                Key.builder().partitionValue(id.toString()).build(),
                Person.class);

        log.info("Found Person from DynamoDb: {}", entityFromDb);
    }
}
Spring Cloud AWS Integration with Parameter Store
To load properties from AWS Parameter Store into your Spring application, you need to configure the application.properties file by adding the following property:
spring.config.import=aws-parameterstore:<path-parameter-store>
For example, assuming you have a path in Parameter Store named /config/localstack, the correct property to add would be:
spring.config.import=aws-parameterstore:/config/localstack/?prefix=localstack.
In this configuration, the suffix "/?prefix=localstack." indicates that the properties in Parameter Store under the path
/config/localstack will be mapped to Spring properties with the prefix "localstack.".
The following class is used to map the properties configured in Parameter Store to variables in the Spring application:
@Component
@ConfigurationProperties(prefix = "localstack")
public class LocalstackProperties {

    private String envValue;

    // getter, setter
}
In this example, the envValue variable will automatically be populated with the value associated with the path /config/localstack/env-value
in Parameter Store. This approach centralizes the management of external configuration properties, making them reusable and easy to manage within the application.
Below is a class that at application startup retrieves the value of the envValue variable from the Parameter Store and logs it:
@Component
public class PrintConfigs {

    private static final Logger log = LoggerFactory.getLogger(PrintConfigs.class);

    private final LocalstackProperties localstackProperties;

    public PrintConfigs(LocalstackProperties localstackProperties) {
        this.localstackProperties = localstackProperties;
    }


    @EventListener(ApplicationReadyEvent.class)
    public void printConfigs() {
        log.info("Printing env value from parameter-store: {}", localstackProperties.getEnvValue());
    }
}
Configuring LocalStack
LocalStack provides multiple ways to run and interact with its services, depending on your needs and environment. Here are some options to get started:
- Install the LocalStack CLI for command-line interaction.
- Install LocalStack Desktop to use the tool via a graphical UI.
- Use the LocalStack extension for Docker Desktop for seamless integration.
- Use Docker Compose or Docker to spin up LocalStack as a container.
- Deploy LocalStack on Kubernetes using Helm for a scalable, containerized setup.
In this tutorial, we will use Docker Compose to run LocalStack locally. Additionally, we will leverage Spring Boot’s property hierarchy to create configuration files that are loaded only when the application is running in a local environment.
Configuring Spring Boot for LocalStack
To configure Spring Boot for LocalStack, create a subfolder named config in the root of your project. Inside this folder,
add an application.properties file with the following content:
spring.cloud.aws.credentials.access-key=test
spring.cloud.aws.credentials.secret-key=test
spring.cloud.aws.region.static=us-east-1
spring.cloud.aws.endpoint=http://localhost:4566
Properties written in the config/application.properties file take precedence over those in the resources/application.properties file. Also, this file will be read only when the application is started locally.
This configuration eliminates the need to create an AWS credentials profile because the credentials and endpoint are explicitly defined. Spring Cloud AWS will use these properties during runtime to interact with LocalStack.
Spring Cloud AWS auto-configures a DefaultCredentialsProvider bean, which determines credentials using the following precedence:
- Java System Properties – aws.accessKeyId and aws.secretAccessKey.
- Environment Variables – AWS_ACCESS_KEY_ID and AWS_SECRET_ACCESS_KEY.
- Web Identity Token Credentials – fetched from system properties or environment variables.
- Credentials Profile File – located at the default path (~/.aws/credentials).
- Amazon ECS Container Credentials – using the AWS_CONTAINER_CREDENTIALS_RELATIVE_URI environment variable.
- Instance Profile Credentials – retrieved via the Amazon EC2 metadata service.
The behavior can be overridden by explicitly setting the spring.cloud.aws.credentials.access-key and spring.cloud.aws.credentials.secret-key
properties, as done in this configuration.
Initializing AWS Resources in LocalStack
Within the same config folder, create an init-aws.sh script that initializes the AWS resources required by the application during LocalStack’s startup:
#!/bin/bash

echo "Create SQS queue"
aws sqs create-queue --queue-name book-event-queue --endpoint-url http://localhost:4566

echo "Create DynamoDB table"
aws dynamodb create-table \
    --table-name person \
    --attribute-definitions \
        AttributeName=id,AttributeType=S \
    --key-schema \
        AttributeName=id,KeyType=HASH \
    --provisioned-throughput \
        ReadCapacityUnits=5,WriteCapacityUnits=5 \
    --endpoint-url http://localhost:4566

echo "Create Parameter Store"
aws ssm put-parameter \
    --name "config/localstack/env-value" \
    --value "local" \
    --type String \
This script creates:
- An SQS queue named
book-event-queue. - A DynamoDB table named
personwith a partition keyid. - A Parameter Store entry at
config/localstack/env-valuewith the valuelocal.
Setting Up Docker Compose
In the root of the project, create a compose.yaml file with the following configuration:
services:
  localstack:
    container_name: "${LOCALSTACK_DOCKER_NAME:-localstack-4.0.3}"
    image: localstack/localstack:4.0.3
    ports:
      - "127.0.0.1:4566:4566"            # LocalStack Gateway
      - "127.0.0.1:4510-4559:4510-4559"  # external services port range
    environment:
      # LocalStack configuration: https://docs.localstack.cloud/references/configuration/
      - DEBUG=${DEBUG:-0}
      - AWS_ACCESS_KEY_ID=test
      - AWS_SECRET_ACCESS_KEY=test
      - AWS_DEFAULT_REGION=us-east-1
    volumes:
#      - "${LOCALSTACK_VOLUME_DIR:-./volume}:/var/lib/localstack"
      - "./config/init-aws.sh:/etc/localstack/init/ready.d/init-aws.sh"  # ready hook
      - "/var/run/docker.sock:/var/run/docker.sock"
Let us analyze the file:
- The
AWS_ACCESS_KEY_IDandAWS_SECRET_ACCESS_KEYenvironment variables match the ones defined in application.properties. - The
init-aws.shscript is mounted as a ready hook, ensuring the AWS resources are initialized during LocalStack’s startup. - The commented line
${LOCALSTACK_VOLUME_DIR:-./volume}:/var/lib/localstackcan be used to persist AWS resources beyond container restarts.
Running LocalStack
From the project root, start LocalStack using:
Podman:
podman compose up -d
Docker:
docker compose up -d
You can monitor the container logs to ensure resources are initialized correctly:
Podman:
podman compose logs -f localstack
Docker:
docker compose logs -f localstack
You will see the following logs:
Create SQS queue
INFO --- [et.reactor-0] localstack.request.aws     : AWS sqs.CreateQueue => 200
{
    "QueueUrl": "http://sqs.us-east-1.localhost.localstack.cloud:4566/000000000000/book-event-queue"
}
Create DynamoDB table
INFO --- [et.reactor-0] localstack.utils.bootstrap : Execution of "require" took 1320.33ms
INFO --- [et.reactor-0] localstack.request.aws     : AWS dynamodb.CreateTable => 200
{
    "TableDescription": {
        "AttributeDefinitions": [
            {
                "AttributeName": "id",
                "AttributeType": "S"
            }
        ],
        "TableName": "person",
        "KeySchema": [
            {
                "AttributeName": "id",
                "KeyType": "HASH"
            }
        ],
        "TableStatus": "ACTIVE",
        "CreationDateTime": 1737820295.128,
        "ProvisionedThroughput": {
            "ReadCapacityUnits": 5,
            "WriteCapacityUnits": 5
        },
        "TableSizeBytes": 0,
        "ItemCount": 0,
        "TableArn": "arn:aws:dynamodb:us-east-1:000000000000:table/person",
        "TableId": "4cdb8ba5-56e2-4b99-9ca4-da2d46a33e8b",
        "DeletionProtectionEnabled": false
    }
}
Create Parameter Store
INFO --- [et.reactor-1] localstack.request.aws     : AWS ssm.PutParameter => 200
{
    "Version": 1
}
Ready.
Well, we have created the SQS, DynamoDB and Parameter Store resources that our application needs.
Monitor LocalStack resources on LocalStack Cloud
You can monitor the AWS resources created with LocalStack by going to LocalStack cloud (you can log in with the GitHub account).
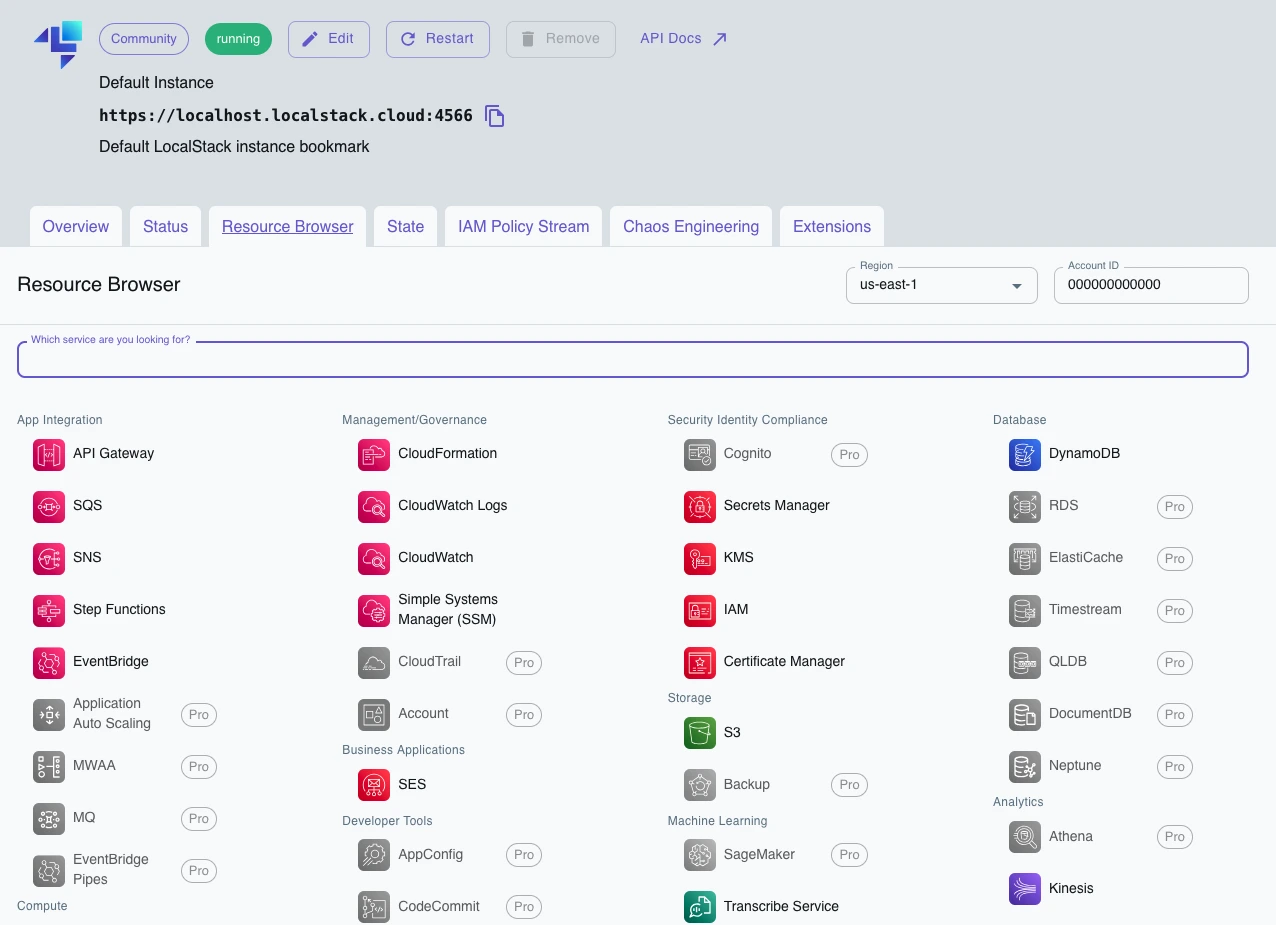
LocalStack Cloud will automatically detect an active LocalStack instance on your machine, allowing you to view created resources such as SQS queues and DynamoDB tables, as well as being able to perform write operations on these tools.
Running the Application
From the project root, start the Spring Boot application using:
./mvnw clean spring-boot:run
Monitor the application logs:
DbInitializer: Found Person from DynamoDb:
 PersonEntity{id=d7cc6d96-c5ac-480d-9a0a-c0f47c7f5abe, name='John Doe', lastName='Smith'}

PrintConfigs: Printing env value from parameter-store: local

BookConsumer: Book event received, headers:
{eventId=27a6d678-9d92-4abd-b069-ca8e03224887, ...},
payload: Book[isbn=isbn, name=Name]
As we can see from the logs, our application interacted correctly with locally created AWS resources thanks to LocalStack.
Conclusions
In this tutorial, we explored how to use LocalStack to create a local environment capable of emulating AWS services like SQS, DynamoDB, and Parameter Store, and integrate it with a Spring Boot application. We configured LocalStack using Docker Compose, initialized the required AWS resources with a dedicated script, and leveraged Spring Cloud AWS to interact with these resources seamlessly.
With this setup, we demonstrated how to replicate a fully functional AWS environment locally, enabling fast and efficient testing and development without relying on the actual cloud. This approach not only simplifies development but also provides a cost-effective and controlled way to ensure code quality in environments that closely mimic production.
Find the full code on my GitHub repo at the following link: GitHub.
More articles about Spring: Spring.
Articles about Docker: Docker.
Recommended books on Spring, Docker, and Kubernetes:
- Cloud Native Spring in Action: https://amzn.to/3xZFg1S
- Pro Spring 6: An In-Depth Guide to the Spring Framework: https://amzn.to/4g8VPff
- Pro Spring Boot 3: An Authoritative Guide With Best Practices: https://amzn.to/4hxdjDp
- Docker: Sviluppare e rilasciare software tramite container: https://amzn.to/3AZEGDI
- Kubernetes. Guida per gestire e orchestrare i container: https://amzn.to/3EdA94v